Lumi is incredibly flexible, meaning there's a variety of options for you to set up a Project in a way that best suits you and your team. Starting something new can sometimes seem overwhelming, but once you're up and running, Lumi will make life easier for your team.
Our support crew can give you some ideas of what is working for teams/projects similar to yours. Ultimately, you know your team and what they do better than anyone. We’ll work with you to make sure your project is set up so that it’s easy for your team to just jump in and get started.
10 Steps For Setting up your Project
Step 1: Create your Dashboard
Step 2: Upload Key Documents
Step 3: Discover Lumi Cards
Step 4: Decide & Create your Card Categories
Step 5: Create Card Templates
Step 6: Create Fields
Step 7: Create a Kanban
Step 8: Create a Board
Step 9: Create a List
Step 10: Create a Welcome Card & Invite Users
Step 1: Create your Dashboard
A Project Dashboard is the homepage for your project in Lumi. It is your project control centre - you decide what you want to see, front and centre. Display the latest content, today's plan, or any important information or documents so that your whole team is on the same page. Dashboards automatically update with real-time data, so you are always looking at the most up-to-date information. What you want to see will likely be different from other Projects, so make it unique to your team.
When you first create a new project, you will receive the Default Lumi Dashboard which has a few key features we recommend for all teams. We've included some instructions on the Dashboard. Once you have a better understanding of where everything in Lumi is and what your team needs, these may not be necessary for your Project Dashboard.

Here are some examples below:

What sort of things can you put on a Dashboard?
Cards - add an individual Card
Card Categories - quick access to one card category or a list of all of them
Boards, Lists & Kanbans – you can add just one or a list of all of them
Text – reminders, quotes of the day, whatever you feel like
Documents – word, PDF and excel docs can be added straight to dashboard for quick access, you can click to open and edit them live.
Images - add an image to your dashboard
Saved Searches - save a search list and add it to your dashboard for quick access
Weblinks - add a URL link to another site or external document etc
Favourites – add a star to your personal favourite things in Lumi for quick access
Video & Audio Links – files stored in Lumi or links to external media
Project Sets - a set of cards/boards etc grouped together (ie all related to a particular week, shoot, person)
Embedded Websites - You can embed a web page on your dashboard. You could have a weather app or news website updating live and accessible on your dashboard
Updating your Dashboard
Account and Project Admins can make changes to Project Dashboards and changes are reflected for the whole team.
To edit or add things to your Dashboard, press the settings wheel in the top right corner of the Dashboard
To add an individual item to your Dashboard, find the item, press this button and select Add to Dashboard 
For a detailed help guide on your Project Dashboard and how to add things to it, please click here.
..
Step 2: Upload Key Documents
Lumi Cards should replace the need for a lot of your documents. We recommend using Microsoft for complicated documents such as budgets and long scripts, or for existing documents created before you discovered Lumi and your life changed : )
Lumi is integrated with Office 365, so if you have a Work or Student Microsoft account you can log in to edit documents in Word, Excel, and Powerpoint online and collaboratively within Lumi.
You can upload existing documents & media to your project by pressing this button in the top right corner of your screen, select "Choose Files" and searching through files on your computer to upload.
All of your documents and media live in your Project Library.

You can also attach documents and media to Lumi Cards (the same document can live on multiple cards to avoid duplication) or you can add them straight onto your Dashboard for easy access.
.
..
Step 3: Discover Lumi Cards
Lumi Cards are live, agile spaces that can be customised to your workflow. You can use Cards to collaborate on a variety of content with your team, as well as storing information, contact details, documents, pictures, video and audio files, web and social media links, time-coded logs, rundowns and much more.
If you're used to working in traditional files and folders with documents, Lumi Cards will replace all of those and give your team a new way to work.

They are perfect for reoccurring or daily content, such as Episodes:

Scenes and stories:

Sponsorship & Commercial Briefs:

....or people such as Clients, Talent & Crew:
You can create Cards very easily.
Press the plus icon  on the left hand side of your screen and select "Card".
You can edit Card Tabs by hitting the blue EDIT button on the far right
Tabs will save automatically or you can hit DONE when you're finished.
You can add your own Tabs by hitting the + next to the Tabs.
For more info on Cards and what they can do, please click here
Step 4: Decide & Create your Card Categories
Understanding Card Categories
Lumi Cards can be categorised as an easy way to group and separate your Cards. Each Card Category can have it's own colour, templates and custom fields etc.
Here are some examples of Card categories:
- If you have LOCATIONS as a Card category, Bondi Beach is Card within that category
- If you have TO DOS as a Card category, Organise Christmas Party would be a Card within that category
- If you have CLIENTS as a Card category, Coca Cola could be a Card within that category
- If you have ACTORS as a Card category, Nicole Kidman would be a Card within that category
- If you have PROJECTS as a Card category, Summer Campaign 2020 would be Card within that category
- If you have EVENTS as a Card category, Fashion Week would be a Card within that category
- If you have RESEARCH as a Card category, the Environmental Cost of Paper could be a Card within that category
Choosing your Card Categories
You'll need to decide what categories your Project needs, don't worry - you can change them at any time. Think about the key aspects that drive your Project; most teams have about 3 - 5 key categories.
- Is your team working on Briefs?
- Do you manage Talent or scouting for Cast?
- Are you putting together a documentary or TV series filled with Scenes or Stories or Research?
- Are you collating Ideas?
- Are you working on multiple Episodes or Shows?
- Are you working on Projects?
- Do you manage Events?
- Are you hiring Crew?
- Are you working on a Project that shoots across multiple Days?
- Do you manage Sponsorship or Clients?
- Are you an executive that wants an overview of all your Jobs or Productions?
Creating Card Categories
Lumi provides some default Card Categories in every new project.
You can create or update Categories in settings and then Card Categories
Press + to make a new one, or select an existing one to edit. 
For more info on setting up your Card Categories please click here
For more info on adding your Card Categories to the Dashboard please click here
....
Step 5: Create Templates
Card Templates are really helpful as they allow you to set up the workflow for your team, and create uniformity amongst your cards.
If you have a Shoots card category, you could set up a template so that when your team creates their first Card e.g. John's Backstory, it would automatically include a Producer Notes tab, a Sponsorship checklist tab, Editorial/Story Beats, Tech Instructions, Scripting and whatever other tabs they need, allowing them to get to work straight away. You can even include an "Instructions" tab, explaining to your team how and where they should do the work they need to.
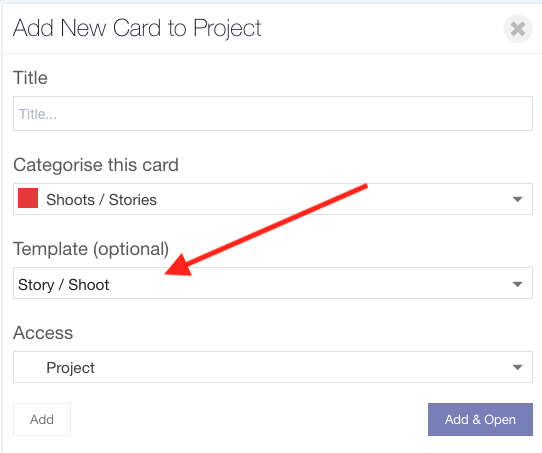
Make a Card Template:
Create a Card by pressing this icon on the left hand side of your screen and select "Card".
Choose a title for the Card, and use a Card Category of your choosing, then "Add & Open".
Make all of the tabs you would like included in the template.
Press the three dots in the top right corner  and then "Save as Template", name the template and "Save".
Now when you create a new Card using that category, anyone in your project can use the template.
For more info on Templates click here
.
..
Step 6: Create Fields
Fields are very very handy. They allow you to track, sort, search and filter your cards in lots of different ways.
There are single choice, multiple-choice, text, date of birth and date Fields. When you are editing a Card that has Fields, you hide or view Fields by pressing this icon
Below is what fields could look like on a Talent Card. There is a DOB field, a single choice Cast Status field, a multiple-choice Paperwork Tracker field, a Comments/Notes text field and more.

The Contact Details & Socials Fields are Lumi default Fields you cannot change, you can add these to any Card Categories in order to have contact details or social media links on a Card. They will be on any Person type Card as default.

Fields are managed in settingsand then Fields
Press + to make a new one, or select an existing one to edit.

Once you've created a Field, you'll need to add it to a Card Category

You can also pull Fields into Lists

Fields are searchable in the Project Library

Fields can be linked to a Kanban. Or used to filter a Kanban
For everything you could possibly know about Fields, click here.
.
..
.
Step 7: Create a Kanban
Kanbans are a great visual way to automatically track and sort your cards by Field values.
Cards are visually divided up on a Kanban using a field you've put on your cards. You'll have to create the field you want before creating a kanban.
As an example, perhaps you are tracking Brief cards through stages. If you update the "Brief Status" field on a card (i.e. if you change the field from "Planning" to "Pending Approval" on their card) it automatically moves them on the kanban from the Planning column to the Pending Approval column. And if you drag a card to another column on the Brief Status Kanban, it will automatically update the Field on the Card.
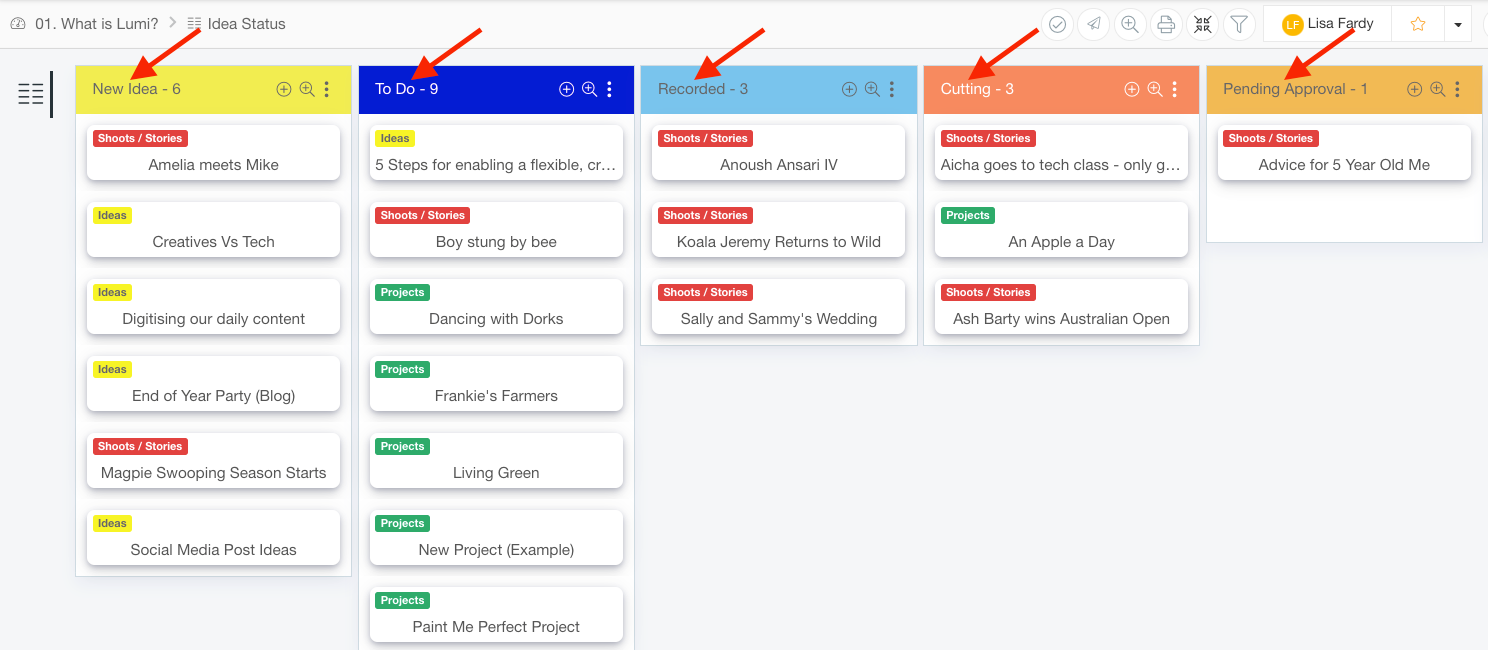
After you have created a Field and linked it to a Card Category, you can create a Kanban.
Create a Kanban:
Press the plus icon on the left hand side of your screen and select "Kanban".
Type a name for your Kanban in the text box.
In the second box, choose the field you want to link the Kanban to e.g. Brief Status.
Hit "Add & Open" to create the Kanban and open it.
Any Cards that already have a field value (a column) on the Kanban, will automatically populate the columns.
Curious about Kanbans? Click here.
..
..
.
Step 8: Create a Board
Lumi Boards are like digital whiteboards or cork boards…they are a place to stick your Cards onto, just like you'd stick post-its or Cards on wall.
Grid Boards allow you the flexibility to place Cards wherever you like. These are great for pitching, putting a mood board together, or comparing options etc.
Column Boards, have well, columns. Similar to those complicated whiteboards covered with whiteboard tape, these are perfect for building a rough edit, running orders, or having a plan of attack accessible online for everyone to see.
Cards can live on multiple Boards at once, different Boards allow you to display the same Card in different ways.

Create a Board:
Press this icon  on the left-hand side of your screen and "Board".
Then name the Board and select Grid Board or Column Board from the "Layout" dropdown menu.
Hit "Add & Open".
Add Cards to a Board:
Press this icon in the top right toolbar of your board or hit the three dots on a Column and select Add Cards.
Search for the card or cards you wish to add to the board from the search bar on the left, and just click to select.
You can create columns by pressing "+ Add Column" on your Column Board.
There are loads more you can do with Boards, just click here.
..
....
Step 9: Create a List
Lumi Lists are a customisable list view of your Cards, add your Cards to Lists and choose your own columns to create a live automatic tracker, that instantly gives you an overview of your work. This way, the overview is automatically populated from the work itself, and not a static spreadsheet, removing unnecessary duplication of your work. You can make updates to the Card from the List itself. Update it here, and it updates everywhere.
This is an example of an Episode Tracker with rows for each episode.

Create a List:
Press this icon on the left-hand side of your screen and "List".
Then name the List and hit "Add & Open".
Add Cards to List
When you have made your List, you can add Cards by hitting the search/plus icon in the top and choose Cards from the side search. You can also add Cards to a List from the Project Library.
To add columns, press the three dots in the top right corner and "Manage Columns."
For more on what you can do with Lists and how to do it, click here.
Step 10: Create a Welcome Card & Invite Users
Welcome Card
Before you invite your team into your beautiful new Project, we suggest that you create a Welcome Card for them as a first point of call. In this Card, you should put in your in-house protocols, a mission statement for why you are using Lumi, naming conventions, and Lumi instructions e.g. when you find a new Contributor, create a Contributor Card, call it [First Name, Last Name] and add it to the Contributor List. This Card is completely unique to your team and your project, and should be set up in a way that best works for you, but if you would like some suggestions on what to include, please contact the Lumi Team.
Press this icon on the left hand side of your screen and select "Card".
Categorise it as "General" and name it "Welcome" or whatever you like. Then "Add & Open"
Add your instructions.
Press the three dots in the top right corner of your window  and "Add to Dashboard".
Yay! Your project is all set up and now you can invite your team to get started.
Invite Users:
Press this icon in the toolbar at the top right of your Lumi browser to invite new users.

Put in their email and select a role and press the plus button to add a new user.
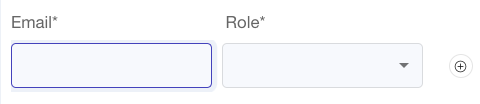
Hit "Invite" when you are finished.
You can manage the users in your project by pressing the Users icon in the toolbar on the left-hand side of your Lumi window.
For more on User Management click here
Well done, you're ready to Lumify your Life.